Enhancing Accessibility in WordPress with Aria Labels Plugin
When it comes to running a website, making sure it’s accessible to everyone is super important. With so many websites out there, we want to make sure everyone can use ours, no matter what. That’s where the Aria Labels plugin comes in. It’s a handy tool that helps make WordPress blocks more accessible. In this post, we’re going to take a closer look at this tool I put together to help make my own WordPress sites more accessible, and see how it can help yours, too.
Aria Labels Aren’t Built-In to Wordpress
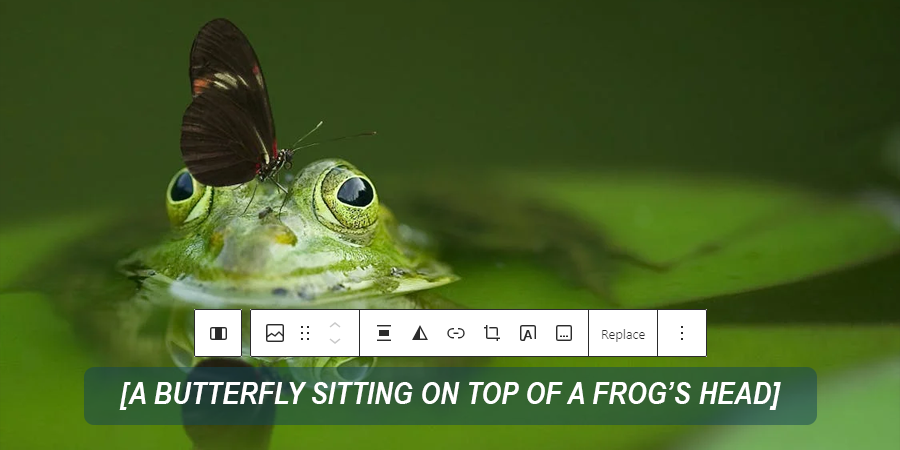
I have started using a bunch of accessibility checking tools while developing my websites in an effort to make everything as accessible as possible. One of the tools kept flagging that I was missing aria-label attributes on some of my images. The images in question were purely decorative, so they were set with empty alt attributes. This is a common practice for decorative images, but it was suggesting that to make the intent of the images as clear to screen readers as possible, I should add aria-label attributes to them.
The sites I was working on were built with WordPress, and I was using the block editor to create content. After some time spent trying to figure out how to add aria-label attributes to images in the block editor, I realized that there wasn’t a built-in way to do it.
I decided to build a plugin to add this functionality to the block editor. I wanted to make it as easy as possible for users to add aria-label and aria-hidden attributes to their blocks, and I wanted to make sure that it was as user-friendly as possible.
Unveiling the Mechanics: A Behind-the-Scenes Look
Introducing, the Aria Labels WordPress plugin!
I’ll go over a few of the key components of the plugin in this post, but the full source code is available on the Aria Labels GitHub Repository (opens in a new tab) if you want to take a look at the whole thing.
The Aria Labels plugin is built around three primary classes, each serving a distinct yet interconnected purpose:
-
Aria Attributes Class:
- This pivotal class, aptly named “Aria Attributes,” operates within the block editor environment. Its primary function is to enqueue a custom JavaScript file responsible for handling front-end integrations.
- Additionally, the class hooks into the
render_blockfilter, intercepting the output of selected blocks before they render on the page. Here, it dynamically adds accessibility attributes based on user-defined preferences. - Within the editor, the JavaScript component adds a user-friendly interface to each block, featuring collapsible sections where users can conveniently toggle
aria-hiddenattributes or input customaria-labels.
-
Render Filters Class:
- The second class, “Render Filters,” serves a specific yet crucial purpose. It operates through a single filter, extending accessibility functionalities to image and cover blocks with empty alt tags.
- By seamlessly integrating
aria-labelsinto these blocks, the Render Filters class enhances compatibility with screen readers and reinforces accessibility standards across diverse content types.
-
Updater Class:
- While not directly related to the core functionality of aria labels, the Updater class represents a pivotal aspect of the Aria Labels plugin. Its primary role revolves around facilitating seamless updates, akin to conventional plugin update mechanisms.
- Leveraging GitHub as its source of truth, the Updater class enables the plugin to fetch and install updates seamlessly. Users are promptly notified of available updates within the WordPress dashboard, complete with detailed release notes for transparency and convenience.
By seamlessly integrating accessibility features into the WordPress block editor, it empowers users to create content that’s accessible to all – regardless of ability or circumstance.
Try the Aria Labels Plugin For Yourself
Ready to embark on your journey towards enhanced accessibility? Follow these simple steps to seamlessly integrate the Aria Labels plugin into your WordPress environment:
Installing the Aria Labels Plugin: A Step-by-Step Guide
-
Download the Plugin:
- Visit the Aria Labels GitHub Repository (opens in a new tab).
- Navigate to the “Releases” tab and locate the latest version of the plugin.
- Download the zip file associated with the release.
-
Extract and Rename:
- Once the zip file is downloaded, extract its contents.
- Inside the extracted folder, you’ll find a directory named “Aria-Labels-[VersionNumber]“.
- Rename this directory to “Aria-Labels”, removing the version number.
-
Re-Zip the Folder:
- After renaming the folder, re-zip it to create a new zip file.
-
Upload to WordPress:
- Log in to your WordPress admin dashboard.
- Navigate to the “Plugins” section and click on “Add New”.
- Select the “Upload Plugin” button at the top of the screen.
- Choose the newly created zip file and click “Install Now”.
-
Activate the Plugin:
- Once the plugin is successfully uploaded, click on the “Activate Plugin” link to activate it.
-
Enjoy Accessibility Features:
- Congratulations! The Aria Labels plugin is now installed and active on your WordPress site. Enjoy its powerful accessibility features as you create content within the Gutenberg block editor.
Easy Updates for Seamless Maintenance:
Going forward, keeping your Aria Labels plugin up-to-date is a breeze. Simply navigate to the “Plugins” section in your WordPress dashboard and check for updates. As long as the plugin is active, if a new version is available, you’ll be prompted to update directly through WordPress’s plugin and theme update screen, just like any other plugin.
Making Your Website Friendlier with Aria Labels
So, you’ve got the Aria Labels plugin ready to roll. That’s awesome! You’re on your way to making your website a better place for everyone. Go ahead, give it a whirl, and let’s make the web a little easier to use for all.
View the Aria Labels GitHub Repository (opens in a new tab).